
Automatic Home Assistant Backup to GitHub
Now is the best time (the only better time was yesterday) to setup a reliable Home Assistant backup to GitHub and start experimenting and enhancing without worries.
And it doesn’t matter if you have brand new Home Assistant installation or there are years of experience and fine tuning in your config files.
What will you get from this Article?
If you’re reading this then you probably already have working Home Assistant.
If not then you better check these two articles:
- HOW TO Install HOME ASSISTANT – Container & Supervised methods – LINK
- Home Assistant on Windows using VirtualBox GUIDE – LINK
Install your Home Assistant and then come back here to learn how to Home Assistant Backup to GitHub.
As you may know you can use Home Assistant snapshots for backup, but there is one major drawback doing this – The snapshots are stored locally.
I will show you another Home Assistant Backup method where your configuration files will be stored securely on GitHub! A set and forget method.
Home Assistant runs on a series of YAML files. So if you manage to automatically backup and version control these files on a remote host – that means you are one step closer to the best DevOps practices.
Where you treat your server not as pet, but as cattle that can be easily replaced if needed.
Now let’s start this.
Installing Terminal Add-on in Home Assistant
Go to Home Assistant > Supervisor > Add-on store and search for “SSH & Web Terminal“.
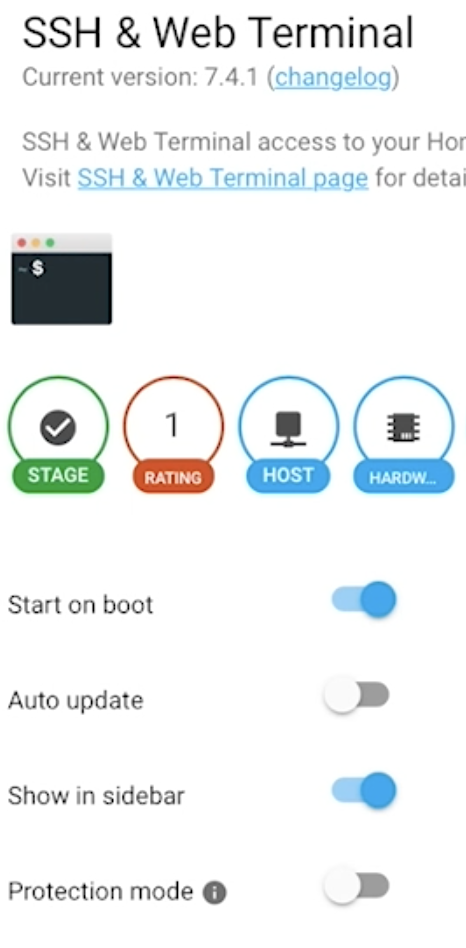
Disable the “Protection mode” (must) and enable “Show in sidebar” (optional).
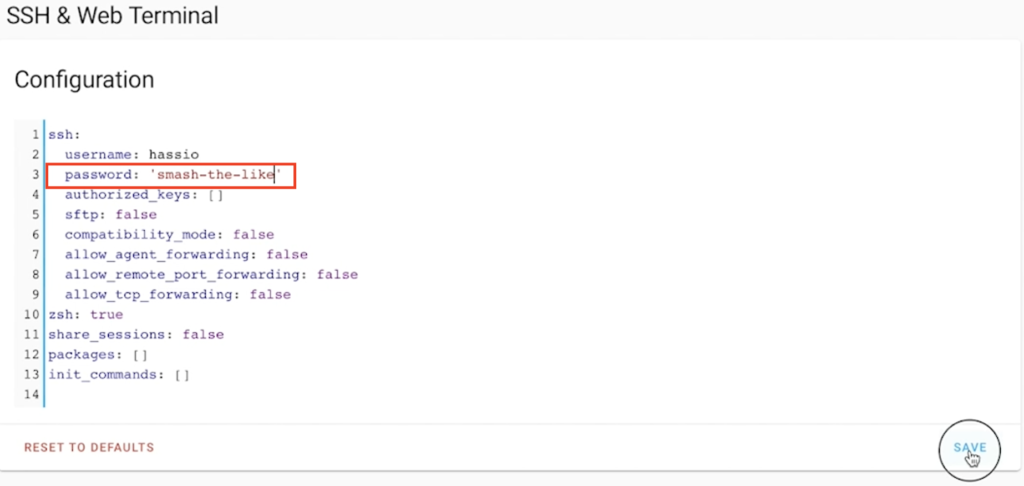
Then go to the Configuration tab of the SSH & Web Terminal add-on and enter a password of your choice there. It is recommended to use SSH key instead of the password here. If you wish to do that you can find more info here.
Set the password or SSH key and hit the SAVE button.
Finally to start it go back to the Info tab of the SSH & Terminal add-on and click on the START button.
If there are no errors in the Log tab you can try to open the add-on either form the sidebar or from the “OPEN WEB UI” button.
We need this add-on because we are going to use some linux commands in a Terminal to enable Automatic Home Assistant Backup to GitHub. Don’t be worry they are not complicated and I will try to explain everything as best as I can.
What is Git and GitHub?
Git de-facto is the standard for version control system.
GitHub is a free online repository for backup, contributing and sharing source code.
And guess what? We are going to use GitHub to backup our Home Assistant configuration.
Creating a GitHub repository
You will need a GitHub account. Go to the GitHub website and create one it is easy & free (best combination). If you already have an account – just log in it.
Next we have to create a repository which again is easy & free.
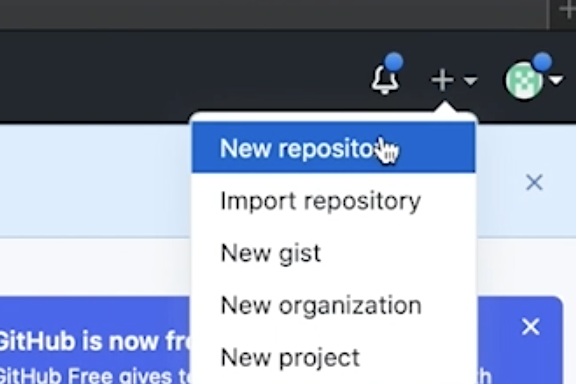
Click on the plus button in the upper right corner of the GitHub web page and select New repository.
Type a repository name, select Private and click on Create repository button.
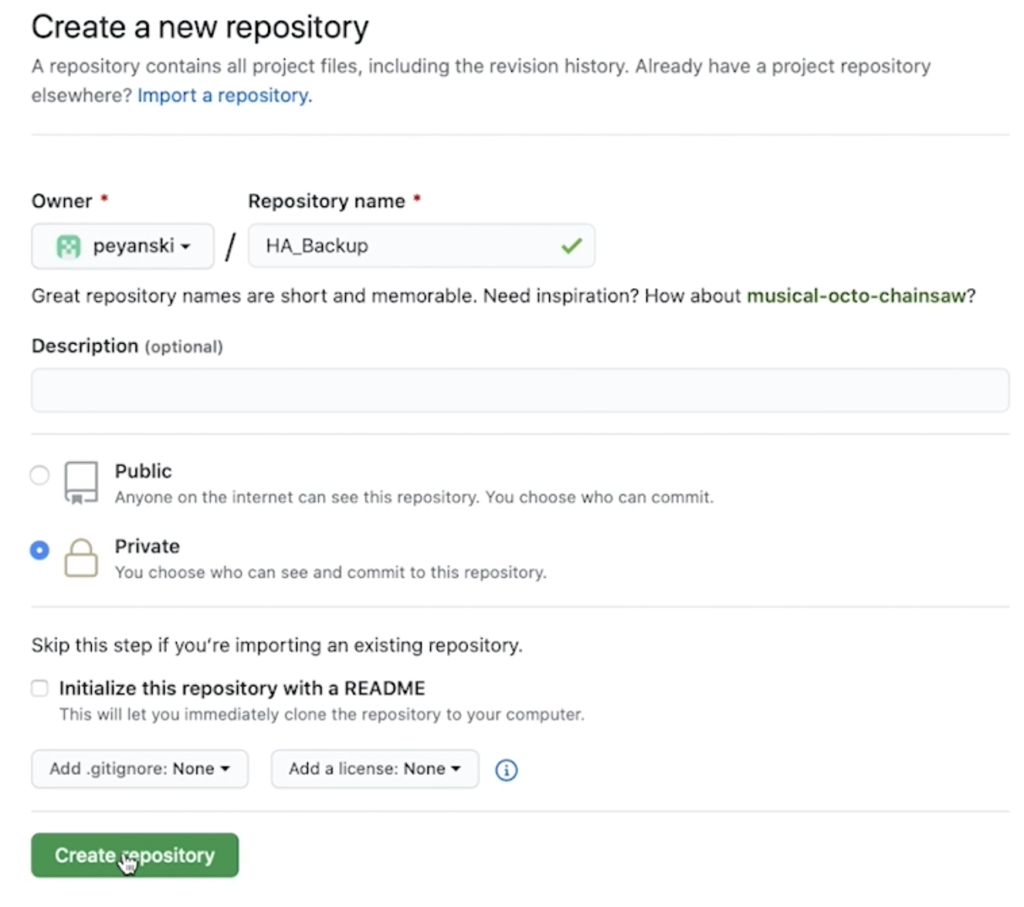
Public vs Private repo?
You can have public or private repos in your GitHub account. I will use private repository as I want to store my Home Assistant passwords there.
If you wish you can make you Home Assistant config files public by selecting Public repository. Just don’t forget to take care about your passwords by not adding your secrets.yaml file to the repo for example.
If you decide to go All-in with private repo and put everything inside, just like me – it is highly recommended to enable 2 Factor Authentication (2FA) for your GitHub account for better protection. You can find how exactly – here.
Creating .gitignore file
Now when we have our repository let’s make a good use of our newly installed SSH & Terminal add-on.
Open the Terminal add-on and go to the Home Assistant configuration folder. For the Home Assistant OS (that is Home Assistant running from an image on virtual machine or on Raspberry Pi) the correct folder is /config”.
For Home Assistant Supervised (that is Home Assistant running from Docker containers with Supervisor menu enabled) – I forgot where it is exactly at the moment – sorry (I will update this at later stage with the exact path).
The folder you are looking for is where you configuration.yaml file is. Find it and enter inside it by using for example
cd /configThen when you double check that you are in the correct configuration folder (remember all yaml files are there, including configuration.yaml) execute the following:
nano .gitignore This will open the nano text editor and it will create a .gitignore file where you can tell which files/folders to be added in the Home Assistant backup to GitHub.
Now you can copy and paste the following lines inside the text editor:
# WARNING: Make your GitHub repo Private if you are using this as it is
# Example .gitignore file for your config dir.
# An * ensures that everything will be ignored.
*
# You can whitelist files/folders with !, these will not be ignored.
!*.yaml
!.gitignore
!*.md
!*.sh
!*.js*

# Comment these 2 lines if you don't want to include your SSH keys
!.ssh/
!id_rsa*

# Comment this if you don't want to include your Node-RED flows.
# This is only valid if you install Node-RED as Home Assistant Add-on
!node-red/

# Uncomment this if you don' want to include secrets.yaml
#secrets.yaml

# Ignore these files/folders
.storage
.cloud
.google.token
home-assistant.log
Use Ctrl +X and press Y and hit Enter to save the file.
Only use the exact .gitignore content if you are using Private repository otherwise you can expose your Home Assistant passwords to the public.
In other words if you use the same .gitignore file, you will include the following files that are in the /config, /config/.ssh/ and /config/node-red folders:
- All – yaml, md, sh, json, js files
- id_rsa, id_rsa.pub, .gitignore files.
And you will ignore/exclude these files and folders from very soon automatic Home Assistant backup to GitHub:
- .storage, .cloud, .google.token, home-assistant.log
Now let’s continue forward.
Git repository initialisation
The following steps are easy and straightforward as it will soon become the Automatic Home Assistant Backup to GitHub.
Just copy and paste the commands in your terminal:
To initialise the repository:
git initTo add all files to the repository with respect to the .gitignore rules
git add .To commit the changes with the commit message “first commit”
git commit -m "first commit" Now you have to add your GitHub repository as a remote repository where the changes can be pushed and to stay only locally.
git remote add origin git@github.com:YOUR_GIT_HUB_ACC/YOUR_REPO.gitCreating SSH keys for GitHub
Before we push our commit to GitHub or in other words before we create our first Manual Home Assistant Backup to GitHub we have to authenticate to GitHub somehow.
And the best way is to use SSH keys. This is how you can do it:
Create a .ssh folder inside your Home Assistant configuration folder.
mkdir .ssh Generate a private and public SSH keys
ssh-keygen -t rsa -b 4096 -C "your@mail.com"The script above will ask you where to store the keys. It is important here not add passphrase to allow Automatic Home Assistant Backup to GitHub at later stage and to change the default path with this one – .ssh/id_rsa

When everything finish you should have your private (id_rsa) and public (id_rsa.pub) keys inside .ssh/ folder, which folder from the other hand should be in Home Assistant configuration folder.
Now we have to copy and paste the content of id_rsa.pub inside the GitHub. So copy the content of the file and go to Github.com > Your Profile > Settings > SSH and GPG keys.
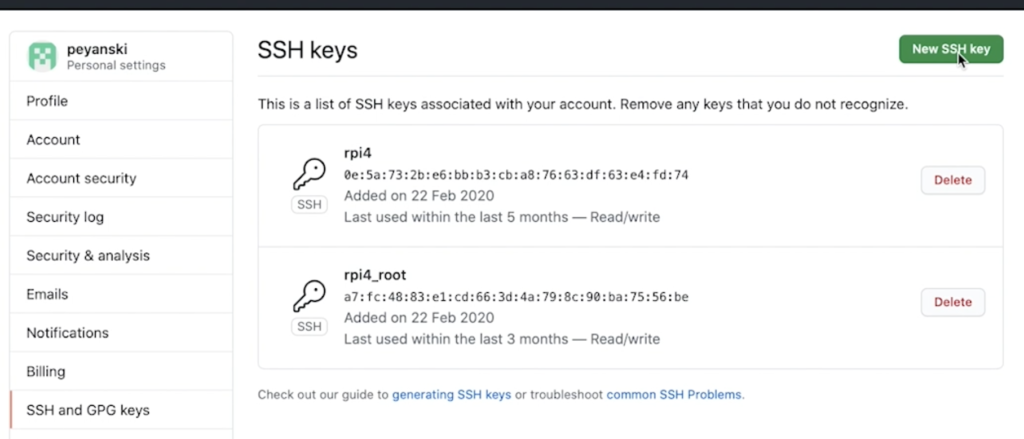
Click on New SSH key, type a Title of your choice and paste the content of id_rsa.pubfile inside it. Then click on Add SSH keybutton.
Tell Git where the SSH Keys are
Because we have stored the SSH key in a non-standard location now we need to tell Git where to find it with the following command.
git config core.sshCommand "ssh -i /config/.ssh/id_rsa -F /dev/null"Pushing all changes to GitHub manually
Now you can push everything you did locally to GitHub with the following command.
git push -u origin master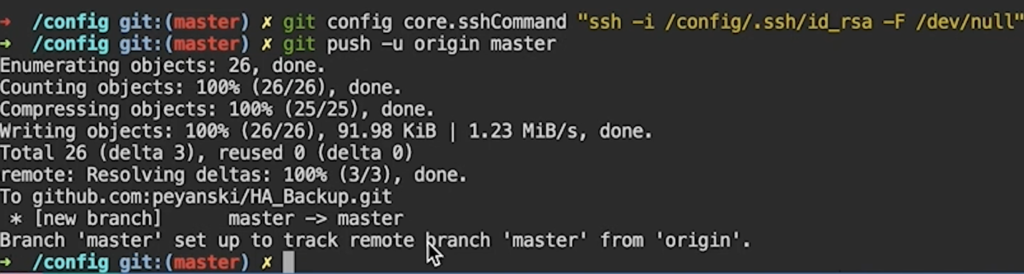
If everything is working without errors and you have your config files in GitHub you can continue to the automation part.
Automatic Home Assistant Backup to GitHub
We can now manually do a Home Assistant GitHub backup, but let’s make this process automatic.
The first step is to smash the like button for the YouTube algorithm.
Just kidding let’s continue.
We will need a shell script for the automation part. Later we will execute this script from Home Assistant automation, but for now just open Terminal and execute the following
nano ha_gitpush.sh and paste the following lines inside the nanotext edior.
# Go to /config folder or
# Change this to your Home Assistant config folder if it is different
cd /config

# Add all files to the repository with respect to .gitignore rules
git add .

# Commit changes with message with current date stamp
git commit -m "config files on `date +'%d-%m-%Y %H:%M:%S'`"

# Push changes towards GitHub
git push -u origin master
Use Ctrl +X and press Y and hit Enter to save the file.
Now we have to make this file executable with this command:
chmod +x ha_gitpush.shTest if the script is working properly by executing it from the Terminal:
./ha_gitpush.shYou should have another commit pushed to Github with commit message equal to the current date and time.
Question Of The Day?
Do you make regular backups of your Home Assistant until now?
Type simple Yes or No in the comments below and I will know for what are you talking about.
Creating Home Assistant Backup to GitHub automation
To create an automation that will regularly do Home Assistant backup to GitHub you can either edit automations.yaml file or you can use the Home Assistant web interface.
I will show you the the first method and if you want to see how to use the web interface – watch my video I’m explaining the GUI method there in details.
Now open automations.yaml file in your favourite text editor or Home Assistant add-on (like File editor) and paste the following text inside it:
#Put this in automations.yaml
- id: l1k3
  alias: push HA configuration to GitHub repo
  trigger:
  # Everyday at 23:23:23 time
  - at: '23:23:23'
    platform: time
  action:
  - data:
      addon: a0d7b954_ssh
      input: /config/ha_gitpush.sh
    service: hassio.addon_stdin
This automation will be triggered everyday at 23:23:23h and it will execute the script that we created in the previous step.
If you want you can try to use the time_pattern platform by changing the trigger part to for example:
# Another trigger for automation just replace in the above if you want this one:
  trigger:
    platform: time_pattern
    # You can also match on interval. This will match every 5 minutes
    minutes: "/5"
To test if the fully Automatic Home Assistant Backup to GitHub work – go to Home Assistant > Configuration > Automations. Find your automation and click on the “EXECUTE” button.

Of course you can wait to the specified time in the automation and see if it will work.
Next Wednesday?
Hey If you like this article, join me again next Wednesday when I will post my new article.
Hit the subscribe button to get notified via e-mail:
Now let’s go back.
Restore Home Assistant
From now you can freely break your Home Assistant installation whenever you wish and this is how you can restore it.
Open the terminal and enter inside your Home Assistant configuration folder:
To go back to the commit before HEAD (current commit and state)
git reset --hard HEAD^To go back two commits before HEAD (current commit and state)
git reset --hard HEAD~2To undo the commands above (reset hard commands) and to return back to the the state before hard resets type:
git reset --hard HEAD@{1}


0 Comments